
GCP’s Cloud Run is a great case study for (almost) all the things you want and need when it comes to developing containerized apps in a comprehensive way. Let’s break out our running shoes for this hype hill.
The killer app: Flatten PDFs
I was recently asked for a solution to flatten (i.e. reduce all objects to a single layer) PDF files before selling them online. This is often required by the licenses of the included art assets to make extraction harder. Commercial PDF apps can do that for you but why bother when you can tap into the power of the Open Source?
After fumbling with command line arguments, I found a combination of ImageMagick and PDFtk that would flatten the pages and, as a bonus, set the meta data fields to disable certain PDF features like copying. Which really isn’t too valuable as it is up to the PDF reader to honor this.
# flatten and protect all PDFs in the working dir

secret=ChangeMe
mkdir -p output
for filename in *.pdf; do
    convert -density 300 -quality 80 -compress jpeg "$filename" - | pdftk - output "output/$filename" owner_pw "$secret" allow printing
done
The downside of this solution is that you have to install some packages and use the command line, which is too complicated for the end user. But installing the stuff and wrapping a web application around it is very easy to do in a Docker container.
And how could you easily run that container in a serverless fashion? With Cloud Run, doh!
Building the Docker image
Here’s a Dockerfile that installs ImageMagick, PDFtk and node.js on a CentOS 7 image:
FROM marketplace.gcr.io/google/centos7
RUN yum -y localinstall https://www.linuxglobal.com/static/blog/pdftk-2.02-1.el7.x86_64.rpm
RUN yum -y install ImageMagick-6.7.8.9
RUN curl https://nodejs.org/dist/v10.16.0/node-v10.16.0-linux-x64.tar.xz | tar --strip-components 1 -xJv -C /usr/local
RUN pdftk --version \
    && convert -version \
    && node -v \
    && npm -v
COPY . /opt/app/
WORKDIR /opt/app
ENV NODE_ENV=production
RUN npm install
CMD ["/usr/local/bin/node", "."]
EXPOSE 8080
You can find the latest code on Github.
Your expert eyes probably got stuck on the first line. marketplace.gcr.io/google/centos7 is the managed CentOS image from Google. You want someone to take care of those so-called base images for you. In this case, we trust Google to update this image in a timely fashion (and we can blame them if our app got hacked). And thus, we unlock:
🏆 Managed base images.
To be able to pull this image locally, you need to authenticate Docker with GCP’s Container Registry:
# if you are not logged in yet
gcloud auth login
# set your GCP project
gcloud config set project $PROJECT_ID
# add Container Registry to your Docker credentials
gcloud auth configure-docker
Setting up Cloud Build and Run
In the Github repo, you’ll find instructions to set up a new GCP project from scratch that is enabled for all the features we use. That’s still a surprisingly involved process on the command line, especially when configuring IAM, where you need to figure out the correct service accounts.
A better solution would be to configure GCP with Terraform. So far though, some pieces like Cloud Run are missing. Edit: That’s available now.
Using Cloud Build to… build
We want our builds standardized and repeatable, so we let Cloud Build do the work:
# upload your soruces and tell Cloud Build to use the build steps in cloudbuild.yaml
gcloud builds submit --config cloudbuild.yaml .
Here’s the corresponding cloudbuild.yaml (Github):
steps:
  # build the container image
- name: 'gcr.io/cloud-builders/docker'
  args: ['build', '-t', 'gcr.io/$PROJECT_ID/${_IMAGE_NAME}', '.']
  # push the container image to Container Registry
- name: 'gcr.io/cloud-builders/docker'
  args: ['push', 'gcr.io/$PROJECT_ID/${_IMAGE_NAME}']
  # Deploy container image to Cloud Run
- name: 'gcr.io/cloud-builders/gcloud'
  args: ['beta', 'run', 'deploy', '${_IMAGE_NAME}', '--image', 'gcr.io/$PROJECT_ID/${_IMAGE_NAME}', '--allow-unauthenticated', '--region', '${_REGION}','--platform', '${_PLATFORM}', '--memory', '${_MEMORY}']
images:
- gcr.io/$PROJECT_ID/${_IMAGE_NAME}
substitutions:
    _IMAGE_NAME: pdfdist
    _REGION: us-central1
    _PLATFORM: managed
    _MEMORY: 1Gi
Cloud Build performs a series of steps which each run in a specialized build container referenced by name. In this case, we use stock images from GCP to build, push and deploy our Docker image. We make use of substitutions to separate configuration values from the build instructions. Custom variables must awkwardly begin with an underscore to distinguish them from built-in variables like $PROJECT_ID.
🏆 Managed build agents.
🏆 Container-based builds.
🏆 Build configuration as code.
As you’d expect from a contemporary build tool, you can configure source code changes to trigger the build.
🏆 Build triggers.
One way or the other, the output of a successful build job looks like this:
[removed docker build output]
Step #0: Successfully built 3883f38a0905
Step #0: Successfully tagged gcr.io/$PROJECT_ID/pdfdist:latest
Finished Step #0
Starting Step #1
Step #1: Already have image (with digest): gcr.io/cloud-builders/docker
Step #1: The push refers to repository [gcr.io/$PROJECT_ID/pdfdist]
Step #1: 736921fe5276: Preparing
Step #1: 2689a7fcb06c: Preparing
Step #1: 0f46a2ec662f: Preparing
Step #1: 77c52cf2a8d4: Preparing
Step #1: 76183a4b6237: Preparing
Step #1: b7737f378d9e: Preparing
Step #1: b7737f378d9e: Waiting
Step #1: 2689a7fcb06c: Pushed
Step #1: b7737f378d9e: Layer already exists
Step #1: 736921fe5276: Pushed
Step #1: 76183a4b6237: Pushed
Step #1: 0f46a2ec662f: Pushed
Step #1: 77c52cf2a8d4: Pushed
Step #1: latest: digest: sha256:f9ff7130c6df9c17b4b92be31c242597799d63e363cd9c944fc5f0fc4bd40f3c size: 1585
Finished Step #1
Starting Step #2
Step #2: Already have image (with digest): gcr.io/cloud-builders/gcloud
Step #2: Deploying container to Cloud Run service [pdfdist] in project [$PROJECT_ID] region [us-central1]
Step #2: Deploying...
Step #2: Creating Revision...............................................................................................................................................................................................done
Step #2: Routing traffic......done
Step #2: Done.
Step #2: Service [pdfdist] revision [pdfdist-00009] has been deployed and is serving traffic at https://pdfdist-something-uc.a.run.app
Finished Step #2
PUSH
Pushing gcr.io/$PROJECT_ID/pdfdist
The push refers to repository [gcr.io/$PROJECT_ID/pdfdist]
736921fe5276: Preparing
2689a7fcb06c: Preparing
0f46a2ec662f: Preparing
77c52cf2a8d4: Preparing
76183a4b6237: Preparing
b7737f378d9e: Preparing
b7737f378d9e: Waiting
77c52cf2a8d4: Layer already exists
2689a7fcb06c: Layer already exists
736921fe5276: Layer already exists
76183a4b6237: Layer already exists
0f46a2ec662f: Layer already exists
b7737f378d9e: Layer already exists
latest: digest: sha256:f9ff7130c6df9c17b4b92be31c242597799d63e363cd9c944fc5f0fc4bd40f3c size: 1585
DONE
You might wonder why there’s a redundant image push in the above output. That’s the result of specifying the images field in cloudbuild.yaml, which, according to the docs, has the added benefit of showing the resulting image as a build artifact in the job history. If we didn’t need an explicit step to push the image (so that is available when we deploy it in the next step), the images field would suffice to make sure that your image is stored in the Container Registry.
Invoking the app
By deploying the Cloud Run app with the argument --allow-unauthenticated, it can be invoked via the randomly picked URL from the build output above (i.e. https://pdfdist-something-uc.a.run.app).
🏆 Easily expose an app.
Built-in observability
As you’d expect from any container platform, process output is fed into a logging service. When the app emits structured JSON, it will be parsed for you automatically.
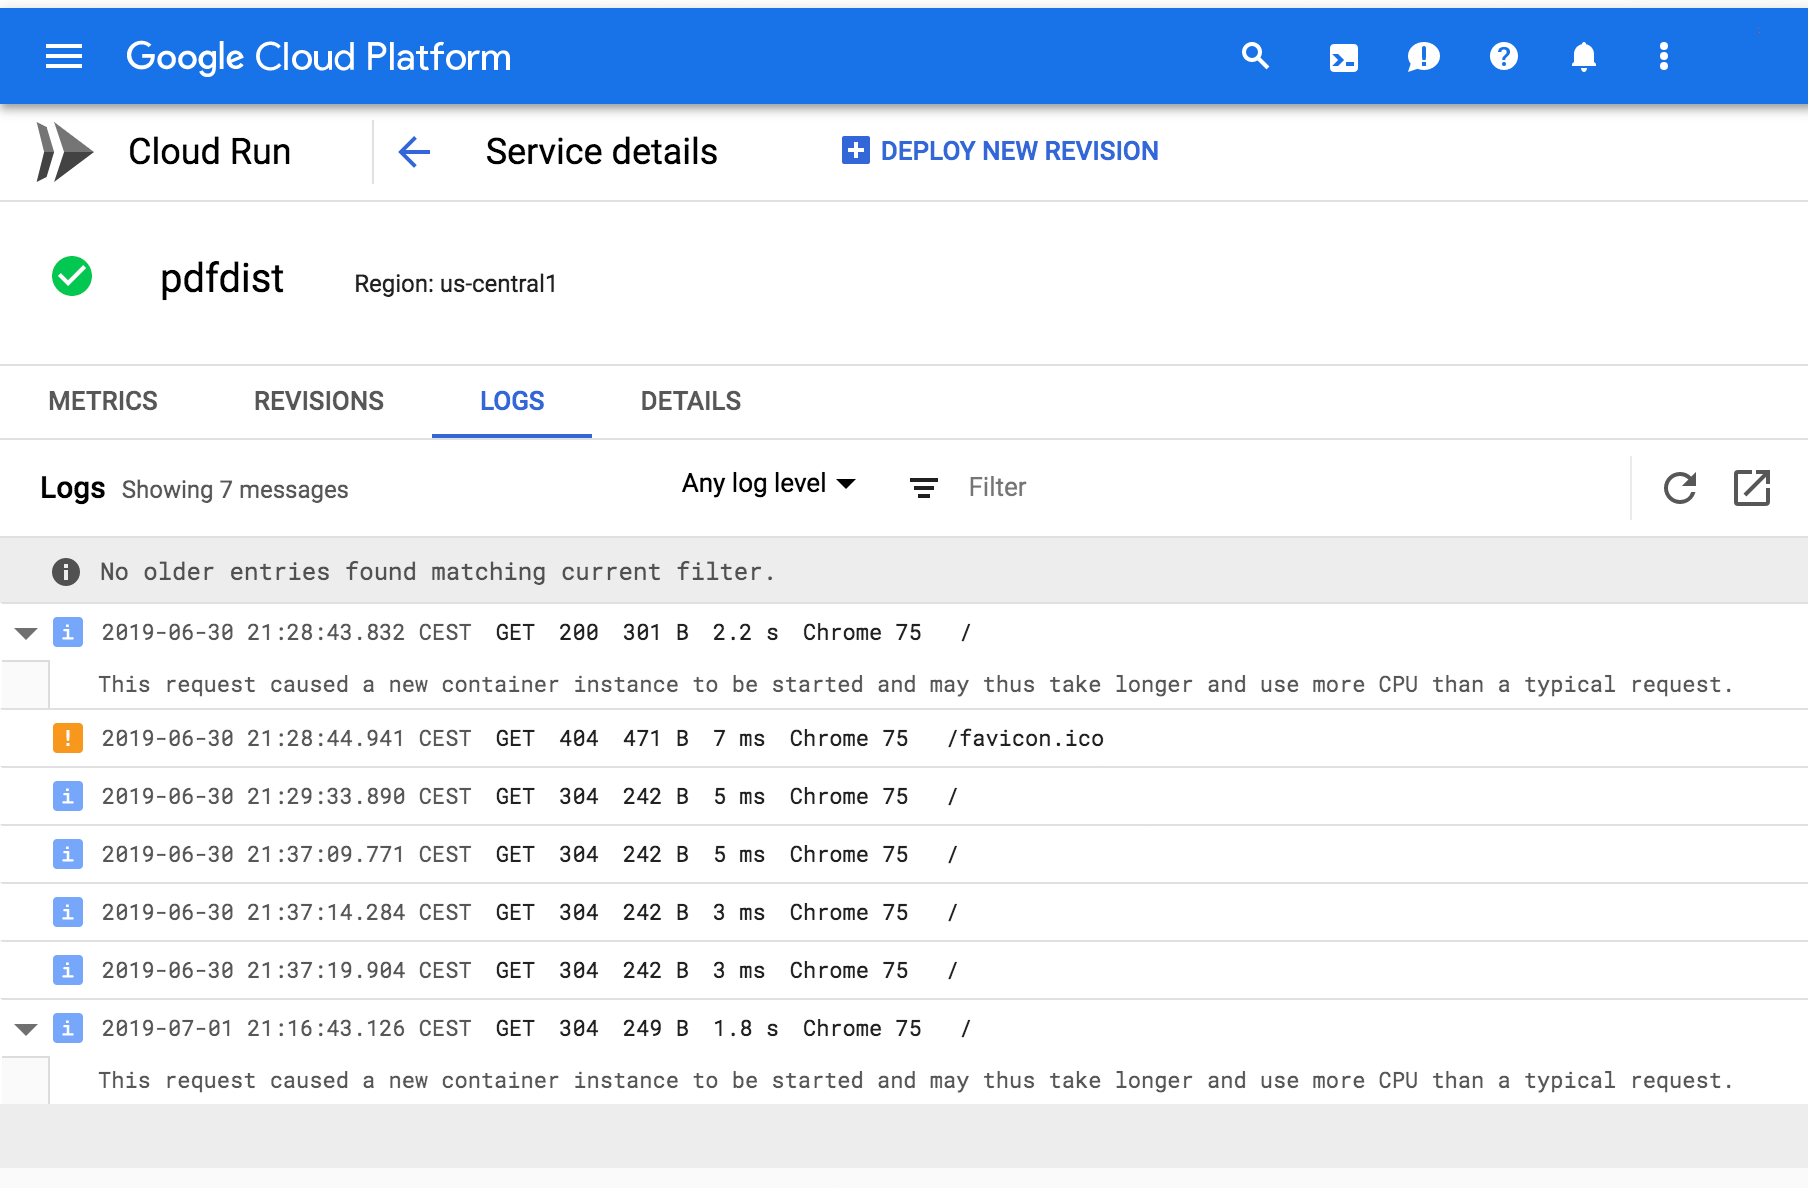
In the image above you can also see some GCP system logs, e.g. one line telling us that the container served the request from a cold start in 2.2 seconds.
🏆 Managed container logging.
GCP’s Stackdriver automatically gathers metrics about your Cloud Run apps and let’s you set alerts. When you fully integrate Stackdriver into your app, e.g. via OpenCensus, you’d gain the ability to trace requests and emit custom metrics. I might check that out in a future post.
🏆 Managed app metrics.
🏆 Managed alerting.
🏆 Managed app tracing.
Bring your own domain with HTTPS
You can verify your domain to be used by Cloud Run and this can be done via the command line. Cloud Run is also handling SSL certificates, which is nice.
🏆 Easily use your own domain with SSL.
Container scanning
You can rely on asynchronous vulnerability scanning of your images, as described here.
🏆 Automatic Docker image security scanning.
Hype & gripe
On the plus side, Cloud Run is super close to a comprehensive, Serverless 2.0 solution:
- Pushing a code change results in a new version of the app being deployed.
- You are not using some proprietary package format, instead you build Docker images, which are flexible and familiar.
- The runtime contract is very portable and lightweight: The container has to listen to port 8080 and that’s it. This is how you want to do Serverless 2.0.
- You gain typical serverless features like autoscaling, scale to zero and automatic endpoints - on a fully-managed infrastructure.
- Observability through logs, metrics and tracing can be easily implemented by using GCP’s built-in solutions.
- GCP’s managed base images and integrated image scanning make a great security baseline.
- My last post mentioned the need to inject database connection information and credentials into containers. Cloud Run has an answer for that: You can reference existing Cloud SQL instances when you deploy your app and those instances will be reachable via a local Unix socket. Neat!
You could stumble over a few things though:
- No support for canary deployments yet, but it is in the works:
Yes it is coming. Our goal is to implement the knative/serving API.
— Steren (@steren) July 3, 2019
❌ Canary deployments.
- You can also set apps to require authentication via GCP’s IAM and put an API gateway, the so-called Extensible Service Proxy, in front of them. I haven’t tried that out, but @steren told me that they are working on big improvements, so maybe hold out on this one for now.
❌ API gateway integration. (better solution in the works)
-
Cloud Run doesn’t run on Kubernetes and it uses gVisor for isolation. That means there might be slight differences and the app’s behavior vs. how it works on your local Docker. E.g. there are some system calls that are not supported by gVisor.
-
On Cloud Run, the container doesn’t get any traditional storage, everything is in memory. So when you need to temporarily store files, it goes against your quota (e.g. 1GB) and you might run out of memory, which kills the container.
Of course, you typically consider containers as stateless and their storage as ephemeral, no matter what platform you use. Still, the idea of “it’s always memory” can make you think in the wrong direction - at least that’s what’s happened to me.
Checking the pulse after our Cloud Run
There’s a lot to like about Cloud Run and that’s why I mentioned it prominently when discussing how to build and run containerized apps in 2020 and beyond. I would even go as far as declaring it as the most comprehensive Serverless 2.0 (i.e. auto-scaling, container-based) solution out there right now.
Cloud Run is still in beta and of course it works best when you make use of all the adjacent GCP services, like Container Registry, Cloud Build and Stackdriver. So there are reasons why you won’t use it now, or ever. Still, I’d encourage you to try it out, because it can help you to explain how a Serverless 2.0 solution - one that you can actually deploy at your company - should work.
What are your thoughts on Cloud Run ? Does it embody the things you want so see in a Serverless 2.0 offering? What is missing?
Let me know your thoughts on Twitter or Linkedin.
Big thanks to @steren for reviewing the post and providing valuable comments.
“runner” by Aarni Heiskanen is licensed under CC BY 2.0